
RageNativeUI is a powerful, lightweight user interface library designed specifically for GTA V mod development through RagePluginHook. It allows developers to create highly interactive and visually appealing in-game menus. These menus are essential for mods that require user input, such as police roleplay tools, vehicle control panels, or any type of in-game configuration options. RageNativeUI streamlines the creation of common interface elements like list selections, checkboxes, sliders, and submenus.
The library is widely adopted among GTA V modders due to its simplicity, flexibility, and compatibility with existing RagePluginHook systems. Whether you are building a complex law enforcement tool or a simple gameplay utility, RageNativeUI provides the essential building blocks to implement robust and user-friendly menu systems within GTA V. Learning how to properly install and configure RageNativeUI is the first step toward developing more immersive and professional GTA V plugins.
Prerequisites for Using RageNativeUI in Your Project
Required Tools and Software
Before starting the installation of RageNativeUI in your GTA V modding project, certain tools and software need to be prepared and installed on your development machine. Below is a comprehensive list of all necessary components:
- RagePluginHook (RPH): This is the primary framework that allows custom plugins to run within GTA V. Ensure you download the latest stable release from the official RagePluginHook website.
- Visual Studio: A modern version of Visual Studio (2019, 2022, or newer) is required as it provides the Integrated Development Environment (IDE) necessary to write, debug, and compile your C# projects.
- GTA V (PC Version): Your copy of Grand Theft Auto V must be compatible with RagePluginHook. Typically, the Rockstar or Epic Games versions are supported.
- RageNativeUI.dll: This is the core library that will be referenced in your project to enable the user interface functionalities.
- .NET Framework 4.6.1 or higher: RagePluginHook projects rely on specific .NET versions. Ensure your Visual Studio project is targeting .NET Framework 4.6.1 or newer for optimal compatibility.
Having these prerequisites correctly installed and configured will create a stable foundation for integrating RageNativeUI into your project.
How to Download RageNativeUI
Find RageNativeUI for Your Project
RageNativeUI is commonly distributed through trusted GTA V modding communities and platforms. Two primary sources where you can obtain the latest and most stable version of RageNativeUI include:
- GitHub: Search for RageNativeUI repositories that are specifically tagged for use with RagePluginHook. Developers often maintain updated versions with release notes.
- LCPDFR.com Forums: As a hub for police modding communities, LCPDFR frequently hosts trusted downloads for RageNativeUI along with other essential modding tools.
Verifying the Latest Version of RageNativeUI
Before downloading, verify that you are using the latest version of RageNativeUI by checking the date of the most recent commit or release. New updates often include bug fixes, compatibility improvements with the latest GTA V patches, and expanded menu functionality. Always avoid outdated or unofficial versions as they may lead to compatibility issues or unexpected errors during runtime.
Download the DLL file and store it in a clearly labeled directory within your project’s folder structure for ease of reference and future maintenance.
Adding RageNativeUI to Your Visual Studio Project
Creating or Opening Your RagePluginHook Project
To integrate RageNativeUI into your GTA V mod, begin by creating a new project within Visual Studio. Select a Class Library (.NET Framework) project type and ensure the framework version aligns with RagePluginHook’s requirements. If you already have an existing plugin project, open it in Visual Studio to continue.
Organize your solution by establishing folders for References, Dependencies, and Libraries to maintain a professional project structure.
Adding RageNativeUI.dll as a Reference
Right-click on the References node in your project’s Solution Explorer within Visual Studio. Select Add Reference…, navigate to the location where you downloaded RageNativeUI.dll, and confirm the addition. Once referenced, Visual Studio will recognize all the namespaces and classes provided by RageNativeUI.
It is essential to also ensure RagePluginHook.dll is referenced in your project as it forms the foundation upon which RageNativeUI operates.
Building and Testing Your Plugin with RageNativeUI
Building Your Visual Studio Project
Once your menu structures are in place, proceed to build the project within Visual Studio. Pay attention to the Build Output to confirm there are no missing references or compilation errors. The resulting DLL will typically be located in the bin\Debug or bin\Release directories, depending on your build configuration.
Placing DLLs Correctly for Game Execution
Copy your newly built plugin DLL along with the referenced RageNativeUI.dll and ensure both are placed within the Plugins directory of your GTA V RagePluginHook folder. This is crucial for the game to locate and load your plugin correctly at runtime.
Launching GTA V with RagePluginHook
Open RagePluginHook’s configuration tool and select your plugin from the list. Launch GTA V through RagePluginHook and activate your menu with a predefined key press, typically within a game loop or command handler like:
- csharp
- Copy
- Edit
if (Game.IsKeyDown(System.Windows.Forms.Keys.F5)) mainMenu.Visible = !mainMenu.Visible;
Confirm the menu appears and operates as expected, testing each interactive element for stability and function.
Common Troubleshooting Tips for RageNativeUI Integration
Identifying and Resolving Common Errors
If your project fails to build or your plugin does not function as expected within GTA V, consider the following common issues and their solutions:
- Missing Reference Error: Double-check that RageNativeUI.dll is correctly added as a reference in Visual Studio.
- File Not Found at Runtime: Ensure RageNativeUI.dll is physically present in the GTA V Plugins directory alongside your plugin’s DLL.
- Version Mismatch: Verify that your RageNativeUI version aligns with your current GTA V and RagePluginHook versions.
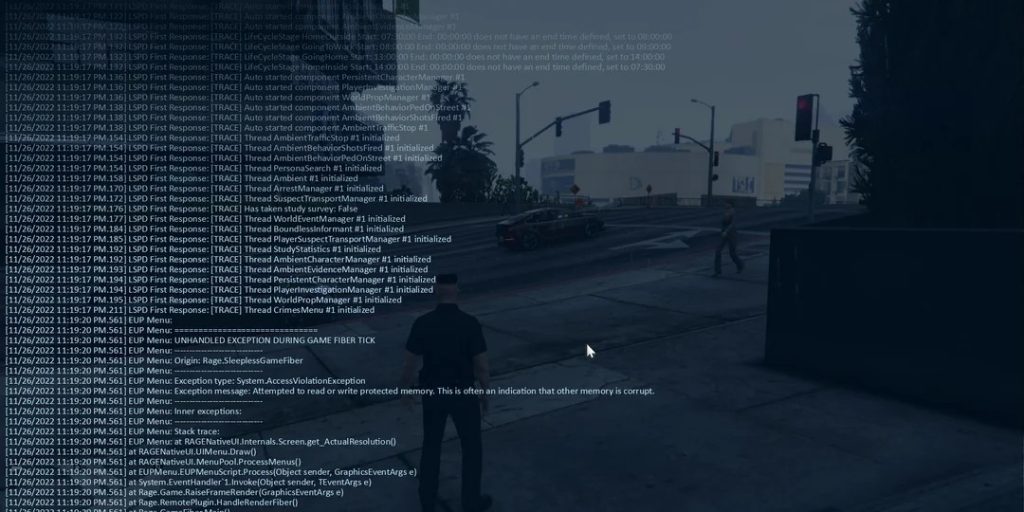
- Unhandled Exceptions: Wrap your menu-related code in try-catch blocks to capture detailed logs for debugging.
- Menu Not Showing: Confirm that ProcessMenus() is being called within your plugin’s game loop consistently.
Best Practices for Stable Development
Maintain a clean and organized project structure. Regularly back up your solution and avoid making rapid, untested changes across multiple areas of your project. Utilize Visual Studio’s built-in diagnostic tools to analyze memory usage and performance impact when rendering menus in-game.
Conclusion
Properly installing RageNativeUI in a GTA V RagePluginHook project allows you to create professional, interactive in-game menus with ease. By following the correct setup steps, including adding references, organizing your project, and testing thoroughly, you ensure compatibility and stability. RageNativeUI simplifies UI development, saving time and enhancing user experience for any GTA V mod, whether for police roleplay, utilities, or gameplay enhancements.